Hello! Today I am super excited to show you my cake pops...
I made them for the birthday party of my friend's daughter.
The little birthay girl choose an Ariel themed party to celebrate.
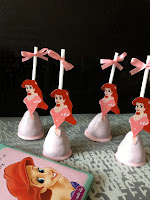
So there I was, looking everywhere on line for inspiration for my cake pops, I found this great tutorial for princess cake pops made by My Cupcake Addiction. I just love her tutorials! She explains everything so you can follow her excactly! Princess Cake Pop Tutorial.
here is a picture of my Ariel Cake Pops:
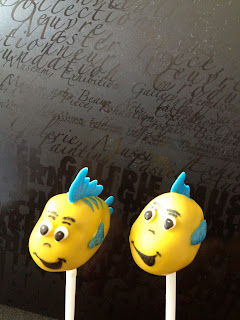
Ok. So I had my Little Mermaids, but how about her loyal friend? I looked and looked to find that there are no cute cake pops of Flounder. So I made my own, and they were beautifull!!!
Sorry I have no pictures of the process, but I think it's quite easy, promise to have some photos next time! If you need some tips and tricks to make the perfect character cake pops click here
You will need: a pintch of fondant, just for the eyes.
Some tylose
Yellow candy melts
Blue candy melts
Your cake balls
Your lolly pop sticks
An edible black marker
Process:
A day before making your cake pops do the eyes, mix the white fondant with 1/8 teaspoon of tylose, roll it and use a little piping tip to cut out the shape of the eyes. I used a wilton 10. Wait for them to dry and using the black marker paint the eye balls, making sure to leave a white dot and being careful not to make your cake pop crossed eye! Having this you are ready to start the good stuff..
This cake pops have to be small, so start by making a smaller ball than normal..
Now make the flaunder shape like this "mold" I made from clay to guide me . I photographed it with the tape so you can figure out the size..
To make the dent where the eyes go, I used my finger.
Put them in the fridge. While they are in there , melt some blue candy melt and put it on a small ziploc bag, cut the tip to leave a very small hole, SMALL! Spread a waxed paper sheet and draw the fins , tail and the upper fins. Leave aside.
Take out your cake pops and let them template a little while you melt the yellow candy melt.
Dip and as fast as you can start putting the fins and tail, starting with the tail and upper fin! Which are the hardest to "glue" after the candy melt cool. You can paste everything using a toothpick and yellow candy melt if you have to.
Let them dry completely before you draw the eyebrows , the line for the nose and the smile.
Now melt a small amount of blue candy melts, and with a toothpick draw the tree lines from the upper fin to the body, not to long!
Enjoy!
Here are some pictures of the finished product:
The best flounder cake pops on the web!
What do you think?


No comments:
Post a Comment