Sunday, June 16, 2013

Brownie Bites Recipe


Everyone loves brownies! Specialy if they are bite size so they make you keep wanting more... I made this for my husband, this recipe is so easy, even my little helper could do her job!

I know being a father is not easy, to allways have the well being of the family on your shoulders. I am very lucky to have a strong man beside me so we could raise our daughters together . This recipe is to endulge the men in our life who make it easier and so much better!. To my other half and the father of my children! I love you!

I only wanted to make 12 mini brownies, with a card that read; a sweet treat for a sweet man... I found this recipe on Health and it worked just fine. But if I ever do them again I will increase the chocolate amount ( just a bit) and put a little less cocoa. Here is the link to the recipe:

Health mini brownie bites recipe

And here are some pictures...

Happy Father's Day!


mini brownies, brownie bites, mini brownies cupcakes


brownie bites, mini brownies, brownie cupcakes


I made this cute little hearts out of icing sugar, but feel free to top them with pecans, coconut or what ever your heart desires!. Enjoy!


Friday, June 14, 2013

Make any store bought cake your own...


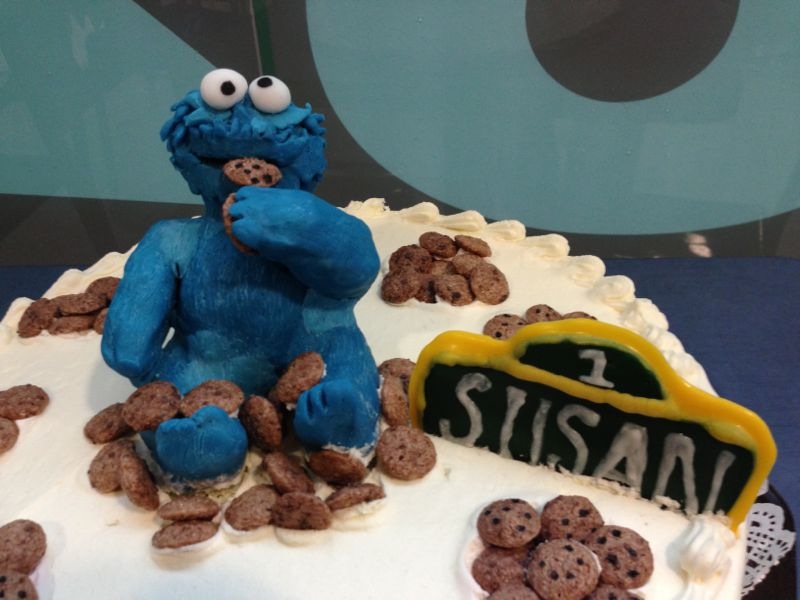
This time I want to share with you my very first attempt of making a cake with chocolate figures..

Ok. So today I cheated, I didn't had the time to make the cake I was planning for my daughter's first birthday, so I went to the bakery, chose a simple cake and added a few things I had for the cake I was planning... Hurray!!! Beautiful and special cake for my little helper's birthday...


cookie monster cake


The first birthday is a very special day!,  A unique little person is starting to show on that angel face and chubby cheeks. I wanted with all my heart to make her a very special cake, I thought Sesame Street would be an easy and cute first birthday theme. So I started on sunday, making modeling chocolate... 
Finding the right recipe is so hard!!! this time , I used candy melts and followed a pretty standar recipe... the result was a rock hard chocolate  that I had to microwave to start using, but hey! I could use it! not so bad for me! I made my rice Kispies figures ...

cookie monster cake

and I tried to make the figure...

cookie monster cake

I don´t know if you can see that I tried to make like fur with a toothpick... huge mistake! I didn´t like the overall efect but my hubbie liked it so I left it that way.

And that´s it! I had no more time to make more figures, no time to bake, and had no money for fondant... But I allready had the cookie monster figure, so I decided to buy a cake and make it my own ...I was very pleased with the results. 
It is the first time I made modeling chocolate, the first time to make any figure using rice krispies, and my first time making any modeling chocolate figures! 


cookie monster cake


What do you think? Be kind! Modeling chocolate is Not Easy!

If you ever find yourself in a situation like mine, don´t hesitate and run to buy a cake, and then make it your own! it can be with fondant, candy melts, modeling chocolate... the limit is your imagination! Even if you didn´t bake the cake, it will have a personal touch and everyone will enjoy it.

I leave you with the picture of my angel with her cake! It is allways a great pleasure to see your little ones grow... I am so proud of my two daughters!


Yes, she has a tiara! it was her birthday! So give me a break!


Monday, June 10, 2013

Tips for making the perfect cake pops


  Making cake pops... piece of cake, right?.
You go ahead and by your candy melts, make your cake balls, dip them in your melted chocolate, and then, before you could even show them to your family,  they are on the floor, or leaking, or cracked... you try to figure out what happened... Go on line and read all you can about them, you did everything like you were supposed to.. or not?
I  have made cake pops for a while now and have learned a lot from my mistakes, so hopefully if you read this you can learn from my mistakes too.
Here are some great tips too if you are making characters cake pops, those are my favorites!

1. If you are making characters , make sure to be inspired by a toy or a tree dimensional figure, not a drawing, this way is easier (trust me) to figure out the details of the character in question. My secret are bubble heads!, yes! they have the perfect shape to study the face you want to make.

2. While making your cake balls , make sure to press firmly enough the cake portion before you make the ball, press , press , press , each time with less presure, then make your ball as you are used to. This will help to blend even better the frosting with the cake, and make your cake pops stronger.

3. Keep it simple, in an attempt to make the perfect cake pop, you can come with an idea that requires a lot of candy, or fondant, or what ever... don´t. keep them as simple as you can , and if you do them correctly, they will look awsome without all that candy on them. Try to shape the cake ball instead of adding candy... that take us to number 4...

4. Use cookie cutters or even your fingers to achieve the desired shape.  Be creative, for instance.. to make the swiper shape, I used a nozzle.. and then reshaped them with my hands.

5. If your shape is a little fragile make sure to dab the cake pops with melted chocolate before you insert your lollipop sticks. I made this with the flounders noses, and the swipers muzzles. using a toothpick and very little candy melt I dabbed to prevent future cracking or melting or other calamity. This is good too, if your cake balls have cracks, just dabb some candy melt in the cracks and leave it to dry completely before you insert the stick in them.

6. Leave them on the fridge for a while. If you allways leave them 30 min. , this time leave them 50. Specially if you are making characters cake pops.

7. This is very very important to prevent candy melt cracking and oil leaking!!! ... You left your cake pops for 50 min on the fridge, now take them out and leave them 30 min. at room temperature before making anything to them!. When 30 min. have passed, then you can dabbed them , and then you can insert your lollipop sticks.  When your cake balls are "warming up" they expand, if you dip them to soon in candy melt they will keep expanding and will crack your beautiful candy melt coating.

8. Tap Tap Tap, and then tap some more. While dipping your cake pops, give them some tough love. They are much stronger than you think! ( and if they are not, then they were going to crack anyway)
tap them to prevent air bubbles that may cause oil leaking and cracking. if you spot one bubble who refuse to go by taping, just poke it with a tooth pick, then tap some more to make the imperfection go away. Tap tap tap your way to perfect beautiful cake pops!


This is what I learned , when I do not follow these steps the results are allways bad.  It works for me and now I hope it works for you!  Don´t doubt to show me your new and perfect cake pops! Please share them with me!

I leave you here pictures of my cake pops... ( my blog is new so I don´t have much)
how to make cake pops


"how to make cake pops"

how to make cake pops


"how to make cake pops"


Saturday, June 8, 2013

Dora the Explorer birthday party


    After days of hard work, my little helpers thirth birthday party is finally over! And I am very proud to tell you it was a succes!. All the kids had a huge smile on their faces all of the time, everyone enjoyed the cupcakes and food, and my table Dora the Explorer style looked very pretty.

Latlety all the birthday parties look amazing, is like a competition between us moms to win the best party prize. I blame pinterest, with all that mouthwatering images and those DIY projects.
Well,  here are some pictures if you want some inspiration, here is what I did...


Dora the explorer party


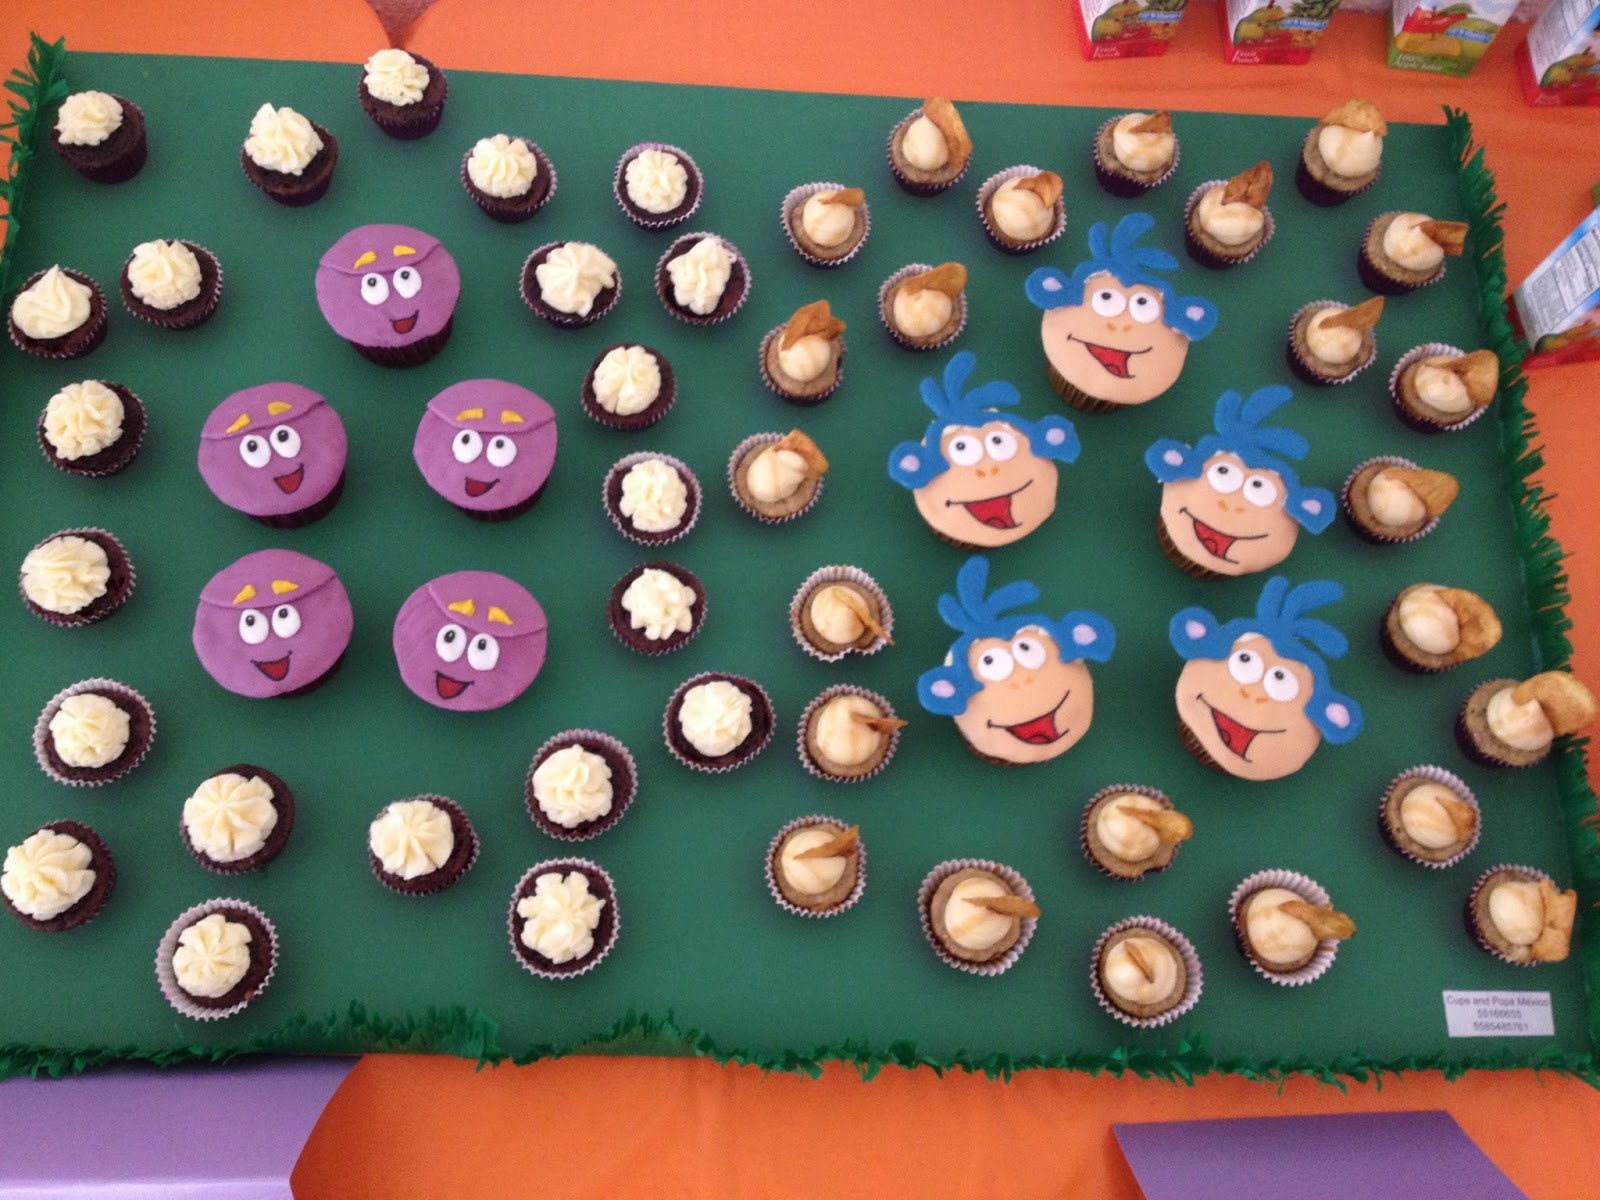
Backpack cupcakes are chocolate with cream cheese frosting , and boots cupcakes are banana cupcakes with caramel frosting, I do not have many pictures because they went pretty fast.

swiper cake pops , dora the explorer cupcakes, boots cupcakes, backpack cupcakes

swiper cake pops... a total hit! I am very proud of myself for these.
I saw on pinterest the idea of painting mozarella cheese strings like maps, and I put them in the backpack toy.

swiper cake pops, cake pops, birthday cake pops, dora cake pops

they were so much fun to make!

swiper cake pops


dora the explorer cupcakes, dora cupcakes, boots cupcakes, dora party


boots cupcakes, dora the explorer cupcakes


backpack cupcakes, dora the explorer cupcakes, dora cupcakes, dora party


We even had a Dora Show!

dora the explorer birthday party

and how could we forget the cake?

dora the explorer cake


It was hard work and a very stresful week, but when I saw the look in my daughters face and the rest of the children, it was all worth it! I can´t wait to next year!

Friday, June 7, 2013

Banana mini cupcakes and caramel frosting recipe


   Today I will share with you one of my greatest recipes ever... my recipe for banana mini cupcakes and caramel frosting. Every time I make them I get compliments and great reviews. So if you are in a sweet tooth mood or want to make delicious mini cupcakes for a party, look no further , this recipe is for you!.

So easy and tasty you will want to bake every party you have!

I made this today for my daughter´s birthday party and the were very popular...


banana mini cupcakes


boots cupcakes


Yes, I made boots cupcakes too and backpack cupcakes, but that is another blog... Yummy right?

Recipe for Banana Minicupcakes:

Ingredients:

  • 1/4 cup all purpose flour.
  • 1/2 cup whole wheat flour.
  • 1/2 teaspoon  baking soda.
  • 1/2 teaspoon baking powder.
  • pintch of salt.
  • 1 and 1/2 riped bananas mashed.
  • 1/3 cup white sugar.
  • 1/2 egg previously beaten by you with a fork. (just mix the whole egg in a cup and then keep the half, and beat with a fork for a bit)
  • 1/2 oz. unsalted butter at room temperature


Procedure:

Preheat your oven 350ยบ . Prepare your liners in your tray. 
In a medium bowl sieve your flour, whole wheat flour, baking powder, baking soda, add salt. 
Cream the butter and bananas together (if your butter was not soft enought beat it first, then add the bananas) , add the sugar, keep beating at medium speed, then add the egg (or half of it).
Stop, and at slow speed , little by little add your flour mix. just keep mixing until all is well blended.
You will have a very thick mix. Not to worry, perfectly normal, you are 10 minutes away from perfect minicupcakes!

Fill your liners 1/3 , 1/2.  Bake for 8 to 13 minutes or until the toothpick comes out clean. 

In my oven they were ready at 12 minutes. 

Caramel Frosting:

  • 1 oz. butter room temperature, almost melting
  • 2 oz. cream cheese
  • 3 table spoons of caramel, I used smuckers, but you can make your own or use what you know.
  • 2 cups sieved icing sugar
  • milk ( just use a teaspoon if you think the frosting is too thick for you) I like it very thick.
Beat the butter on a medium speed for 1 minute, then add the cream cheese, beat until they are perfectly blended and can´t tell them apart. Add the caramel, then at a very slow speed add your sugar , one spoonfull at a time until blended. If you think is very thick, add the teaspoon of milk.

And this is it! pipe away the way you like and use anything you like to make them pretty. I drizzled them with more caramel and use a banana chip. 
Enjoy the compliments and remember me when you do. 


Friday, May 31, 2013

Is the cupcake dead?


Yesterday I read an article from the Seaway News claiming the cupcakes are death.
And I quote:
"I can't say I'm astonished. The cupcake craze had 'passing fad a la Hula Hoop' written all over it from the time the first shops opened back in the early years of the millennium. Imagine: a phenomenon that owed its existence to a single episode of the TV soap opera Sex and the City which happened to feature a cupcake shop. Talk about a flimsy foundation. "

It made me think a little of the cupcake status here in Mexico, (as I cant speak for other cities) yes, once upon a time there were cupcake shops as starbucks... In other words, we had a lot of cupcake shops!
But then, one by one began closing their doors, now I only know of two shops that survived... But, is the cupcake dead?
I dont think so.

In my experience and opinion, making cupakes is not economic, in fact, is very expensive, if you add the cost of renting a place, and the cost of helpers for the shop the prices skyrocketed... The average cupcake cost in a store went as hi as 4$ ( without any embelisments)
In mexico, 4 dollars the cupcake is pretty hi , so the people only ate them at special ocations, forcing the shops to low the cuality of their profuct to keep making a profit, that lead to insatisfied costumers
That lead to closed shops.

But closed cupcake shops does not mean the cupcake is dying! I keep seeing them everywhere! At showers, children parties , and other events. It just changed the way people buy cupcakes. In order to make a delicious cupcake made with hi quality products , the cupcake has to be home made.

The cupcake is not death, and all the people on this communities are living proof!
They are delicious , the perfect size, and make the perfect decoration for events.
Versatile and cute as they are I hope they never die!!

I leave you the link to the article here if you want to read it too and share your opinion.

Seaway News

Wednesday, May 29, 2013

Birthday Cake

Today is a very special day... Today my little helper turns 3!
I am very excited and grateful to life for having such a beautiful inteligent and loving daughter. 3 years of challenges , sleepless nights and constant worries.
3 years of putting up with everyones advice and opinion, even the advice of random people on the supermarket!
Many days of second guessing myself as a mom, not knowing what I am doing, but doing it from a place of love, even the yelling ( thats what I say to myself). Being a mom of two has not being easy, no one prepares you for what is yet to come, but no one prepares you either for the love.
3 years ago my heart grew in many ways, I can now find joy in my childs eyes, smile, laughter. I opened to a hole new sistem of believes, where old fashioned values have their place, where my mom is my superhero and all the other moms out there giving the best they have.
Now when I see a kid making a tantrum at the mall I smile, and pray to not be the next one.
3 wonderfull years!
Ok I will stop for now, and start with the cake bussines...

Next week my little helper is having her party, and of course I am making cupcakes and cake pops for her Dora Themed bash! ( expect photos, many of them)
I needed purple frosting for Doras backpack cupcakes, and not being a fan of colorant I thought blackberry icing would be perfect and delicious.
Of course I had to try it first, so I made this chocolate nutella cake and frosted with my new recipe. I know the design is not the most original but it is beautiful and I like it! And because I am allways doing cupcakes this is the perfect excuse to try it myself . So here it is: my daughters bithday cake!

I didn't had any fondant for the butterflies so I used candy melts . I ran out of frosting before I could finish. Also turns out that the wilton 2C tip dont make roses as the wilton 2D .... But who cares! the taste with the blackberry frosting and the nutella was out of this world!